Installation Guide
This document explains how to install Resolve Insights 11.0 on Linux VMs using IPv4/IPv6 addresses.
System Requirements
Before you install Resolve Insights, ensure that your hardware and software meet the requirements listed in this section.
Hardware Requirements
The Resolve Insights cluster can run on physical or virtual machines. Ensure that your Insights cluster machines meet the minimum hardware requirements listed below. The minimum configuration's upper device discovery and dependency mapping limit is rated at about 3000 devices.
- Normalization and Correlation Engine (NCE):
- Node count: 3.
- CPU count: 16 x86-64 vCPU per node (4 Cores x 4 Sockets or 8 Cores x 2 Sockets).
- RAM: 32 GB per node.
- Storage: 200 GB directly attached storage with a single mount point
/optor another directory where Insights will be installed (90% of total storage). If using VMs, provision as "Thick" to ensure optimal operation.
- Data Collector Module (DC)
- Node count: 1 per site.
- CPU count: 8 x86-64 vCPU per node (4 Cores x 2 Sockets).
- RAM: 24 GB per node.
- Storage: 200 GB directly attached storage with a single mount point
/optor another directory where Insights will be installed (90% of total storage). If using VMs, provision as "Thick" to ensure optimal operation.
Software Requirements
Ensure that your Resolve Insights cluster machines meet the software requirements listed below.
- OS:
- RHEL 64-bit 7.4 or later up to 8. RHEL 9 is not supported
- AlmaLinux 8
- Virtualization:
- Docker 21 or above OR Podman 4.X
- Docker compose (if using Podman, a docker compose should be explicitly configured for usage)
Prerequisites
The following provisions and configuration must be in place before starting the installation.
- All nodes are configured with a static IP address.
- All nodes' clocks are synchronized.
- All nodes' hostnames are resolvable using your DNS or you have
/etc/hostentries for them on every node of the Insights cluster. - All nodes have access to the OS’ yum repositories on the Internet.
- All nodes use stock OS configuration, including stock state of the environment variables.
- You need a certain level of access to the OS to successfully upgrade Insights. Use either:
- Full root access
- A sudoer with the following minimum permissions in
/etc/sudoers:
Substitute your username forresolveinsightsbelow. Substitute the/optdirectory with the actual directory where Insights will be installed."resolveinsights":cmnd_Alias MERIDIAN = /bin/ln, /bin/kill, /bin/vi, /bin/cat, /sbin/service, /FS/meridian/meridian-tools/meridian-deploy, /opt/FS/meridian/meridian-tools/meridian-uninstall, /bin/mkdirresolveinsights ALL=(ALL) NOPASSWD: MERIDIAN
Network Port Prerequisites
Your firewall must allow the following network ports between the specified network actors. In addition, allow any ports required for access to Resolve Insights servers by your third-party integrations.
Also, see the port information in Discoverable Devices Prerequisites.
| Port Number | Protocol | Direction | Purpose |
|---|---|---|---|
| 443 | TCP (HTTPS) | NCE <> DC | Bidirectional communication between NCE and DC servers. |
| 6667 | TCP | DC > NCE | Secure Data Transfer over Kafka Queue from DC to NCE. |
| 6379 | TCP | DC > NCE | DC to NCE communication. |
| 22 | TCP (SSH) | NCE <> DC | (Optional) General administration |
| N/A | ICMP | NCE <> DC | ICMP ping (for troubleshooting). |
| 5671 | TCP (SSL) | DC <> DC | DC to DC communication when multiple DC nodes run on the same site. |
| 2888, 3888 | TCP | NCE <> NCE | Zookeeper communication for quorum formation. |
| 9200 | TCP | DC > NCE | Communication between Logstash on DC and ElasticSearch on NCE. |
| 9200 | TCP | NCE > NetFlow | For communication between Logstash on NCE & ElasticSearch on NetFlow. |
| 443 | TCP | NCE > ITSM | Integration with an ITSM system for CMDB CI updates. |
Discoverable Devices Prerequisites
- CDP/LLDP must be enabled on all the network devices for the topology to show links.
- All devices are expected to have English installed as the OS language even if it is not set as default.
- If there is a firewall between the Insights servers and the discoverable devices, ensure that it allows the following ports:
| Port Number | Protocol | Direction | Purpose |
|---|---|---|---|
| 22 | TCP/SSH | DCM > Devices | SSH connection to the device from Insights. |
| 23 | Telnet | DCM > Devices | Telnet connection to the device. |
| 80 | TCP (HTTP) | DCM > Devices | VMware/EMC/Pure/F5/etc. API access. |
| 443 | TCP (HTTPS) | DCM > Devices | VMware/EMC/Pure/F5/etc. API access. |
| 5985, 5986 | TCP (HTTPS) | DCM > Windows devices | Access to Windows Server through WMI/Powershell (2008 and later). |
| 1025-5000 | TCP | DCM > Windows devices | Access to Windows Server 2003 through WMI. |
| 8443 | TCP (HTTPS) | DCM > Devices | Access to EMC devices through NaviCLI. |
| N/A | ICMP | DCM > Devices | Device discovery, troubleshooting. |
| 5988, 5989 | SMI-S | DCM > Devices | Storage SMI-S interface for EMC/Pure/NetApp, etc. |
Pre-Installation Tasks
The tasks and information in this section aim to ensure that your environment is properly configured before you start the actual installation. Some of the tasks are mandatory while others are optional.
The following step is needed when the NCE and DC servers do not have access to the RPM repos.
- (All nodes) Manually install chrpath and GCC packages.
yum install chrpath
yum install gcc - (All nodes) Create a directory to download the installation package to and run the server from. Repeat this task on each of the VMs that will be part of the deployment environment. Substitute the
/optdirectory with the actual directory where Insights will be installed.mkdir /opt/FS - (All nodes) Enter the directory that you created for Insights. Repeat this task on each of the VMs that will be part of the deployment environment.
cd /opt/FS - (All nodes) Transfer the installation package that you received from Resolve to
/opt/FSor the actual directory where Insights will be installed. - (All nodes) Unpack the installation package:
tar -xvzf ./meridian-<VERSION>.tgz
Configuring the Deployment
Before you start the installation, you need to provide details about your environment and the deployment type. Use the deploy.config file to provide those details.
Prepare a deploy.config file for each node that you will have in your Insights cluster. Each configuration setting in this file is labeled with the node type or types that it applies to.
On nodes where the setting is not required, keep its default value. Do not remove the line and do not delete the value.
Repeat these steps on each of the VMs that will be part of the deployment environment and take note of which node type you're configuring.
(All nodes) Open
deploy.configfor editing: Replace/opt/FSin the next command with the directory you created for Insights.vi /opt/FS/meridian-<VERSION>/meridian-tools/deploy.config(All nodes) Update the variables in the
deploy.configfile as per the node role:#############################################################
# Necessary Input Parameters
#############################################################
### ESSENTIAL ###
VERSION="11.1.0" //(All) Build number that is being deployed
NCE_MASTER_IP="1.1.1.1" //(All) NCE Master IP in IPv4 or IPv6 format
NCE_MASTER_HOSTNAME="test-nce1" //(All) Hostname of NCE Master
DEPLOYMENT_PATH="/opt/FS" //(All) The installation directory that you created
################
### Needed for NCE-Cluster setup ###
NCE_WORKERS="1.1.1.2, 1.1.1.3" //(All) NCE Workers IP in IPv4 or IPv6 format
NCE_HOSTS="test-nce2,test-nce3" //(All) Hostname of NCE Workers
### DC Installation ###
### ESSENTIAL for DC ###
DC_MASTER_IP="1.1.1.4" //(DC nodes only) DC Master IP in IPv4 or IPv6 format
DC_MASTER_HOSTNAME="test-dc1" //(DC nodes only) Hostname of DC Master
KAFKA_DC_GROUP_ID="Group1" //(DC nodes only) Name of cluster group to add DC nodes in. You cannot change this name after the deployment.
#####################
DC_HOSTS="test-dc2,test-dc3" //(DC workers only) Hostname of DC Workers
DC_WORKERS="1.1.1.5,1.1.1.6" //(DC workers only) DC Workers IP in IPv4 or IPv6 format
### GENERAL PARAMETERS ###
UPGRADE_FLAG="false" //(All) Set to true if running an upgrade from one version to another
QUIET_FLAG=1 //(All, optional) Set to 1 to suppress any confirmation prompts during deployment
LOG_LEVEL="WARN" //(All, optional) Set the log verbosity level - OFF, DEBUG, ERROR, FATAL, INFO, WARN, TRACE
ALL_IN_ONE=0 //(All) Set by default to cluster (0) installation type. Set to all-in-one (1) installation type for POCs
IGNORE_PRE_REQ_CHECK=0 //(All, optional) Set to 1 to ignore prerequisites like ulimit and ICMP reachability
FIREWALL_FLAG="true" //(All, optional) Set to false if no firewall is configured in the environment to ignore the firewall-related steps
MERIDIAN_USER="meridian" //(All, optional) Set the Unix username for deployment
MERIDIAN_GROUP="meridian" //(All, optional) Set the Unix group name for deployment
MERIDIAN_HOME="/opt/meridian" //(All, optional) Set the installation directory
SHARED_PATH="${MERIDIAN_HOME}/share" //(All, optional) Set the directory used for sharing files within the Insights setup
localhost_ip="1.1.1.1" //(All, optional) IPv4: Set to preferred IP in case of multiple IPs. IPv6: Always set
is_localhost_ip_overridden="false" //(All, optional) IPv4: Set to true in case of multiple IPs. IPv6: Always set
NON_ROOT_FLAG=0 //(All, optional) Set to true (1) if the Unix username does not have root permissions. The setup will use the prefix from the access level to execute the root commands
SUDO_MODE="sudo" //(All, optional) Set the access level - sudo or dzdo
Deploying Insights
After preparing deploy.config files for all node types that you will have, you are ready to start the deployment.
The deployment order depends on the type of cluster that you are upgrading. See below the procedure for the actual deployment commands.
- (All NCE Workers) To start the installation on an NCE worker node, run the deployment script with the
deploy.configfile as an input. You can deploy NCE workers in parallel. Substitute the/optdirectory with the actual directory where Insights will be installed./opt/FS/meridian-$VERSION/meridian-tools/meridian-deploy -f /opt/FS/meridian-$VERSION/meridian-tools/deploy.config - (All NCE Workers) After a node deployment completes as evidenced by the success message, ensure that all Insights services are up and running:
service meridian status - (NCE Master) To start the installation on an NCE Master node, run the deployment script with the
deploy.configfile as an input. Substitute the/optdirectory with the actual directory where Insights will be installed./opt/FS/meridian-$VERSION/meridian-tools/meridian-deploy -f /opt/FS/meridian-$VERSION/meridian-tools/deploy.config - (NCE Master) After a node deployment completes as evidenced by the success message, ensure that all Insights services are up and running:
service meridian status - (DC Master) To start the installation on a DC Master node, run the deployment script with the
deploy.configfile as an input. Substitute the/optdirectory with the actual directory where Insights will be installed./opt/FS/meridian-$VERSION/meridian-tools/meridian-deploy -f /opt/FS/meridian-$VERSION/meridian-tools/deploy.config - (DC Master) After a node deployment completes as evidenced by the success message, ensure that all Insights services are up and running:
service meridian status - (All DC Workers) To start the installation on a DC worker node, run the deployment script with the
deploy.configfile as an input. You can deploy DC workers in parallel. Substitute the/optdirectory with the actual directory where Insights will be installed./opt/FS/meridian-$VERSION/meridian-tools/meridian-deploy -f /opt/FS/meridian-$VERSION/meridian-tools/deploy.config - (All DC Workers) After a node deployment completes as evidenced by the success message, ensure that all Insights services are up and running:
service meridian status
If any service is showing down, then try restarting it using the following commands:
service <service_name> stop
service <service_name> start
Licensing Resolve Insights
The default Insights installation comes with a 30-day trial license. It provides restricted access to the application's features that enables you only to:
- Create organizations and sites;
- In the Discovery menu, discover a maximum of 200 devices and set a Server Flows Schedule;
- In the Inventory menu, access the Table View and Device View.
Licensing Insights unlocks its full features. To do it, take the following steps:
- On the login screen, click Update License.
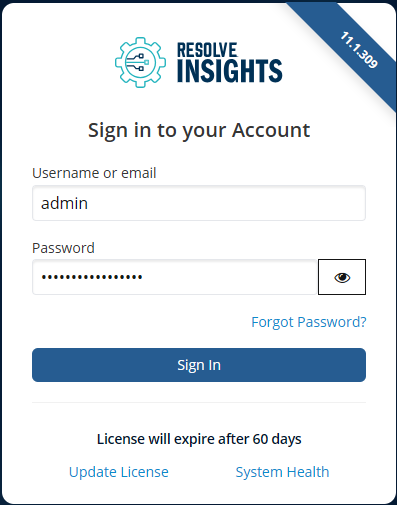
- Enter the license key provided by your Resolve representative.
- Click Update.
You can also do it from the home screen:
- Log in to Insights.
- On the home screen, click the profile icon.
- In the drop-down, click Update License.

This opens a dialog box. - Enter the license key provided by your Resolve representative.
- Click Update.